With automated signatures in document containers, you can save valuable time by eliminating the need for manual signatures whilst improving the overall quality of your letters.
This article will guide you on how to automate your signatures in document containers. Once you’ve set this up, you can efficiently streamline your firm's document management process.
Table of Contents
- Insert and verify signature automation
- Automating based on Person Responsible or Current User
- Automating based on an Ask
- Use Word tables to automate signatures side by side
Best practice signature setup
triConvey allows you to automate staff signatures to suit your firm's requirements. You can automate signatures based on one of the following:
- Person Responsible field in a matter file.
- Current User.
- Ask automation (selecting the required signature automation from a dropdown menu upon generating a letter).
These are ranked according to how simple it is to set up. Decide on which data field best suits your firm. For example, if the signature on client letters must always be from the matter’s Person Responsible, then it is simplest to base the automation on that data field.
You must create If/Then/Else statements for firms with more than one staff member to ensure the automation of the correct image file. Inserting automation fields may account for other data such as name and role title.
We recommend using Word’s Show Paragraphs feature when editing a container to easily identify line breaks.
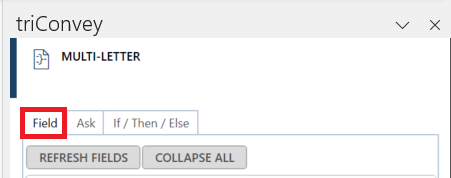
Insert and verify signature automation
1. Select the gear icon from the top right corner of the triConvey Desktop App.
2. Select Document Containers from the left menu.
3. Right-click the container that requires signature automation and select Modify.
Tip: This will open the container in Word.4. Type a sign-off (e.g., Yours Sincerely) after the <<Body Content>> tag.
Tip: This allows the signature to automate below any typed text.5. Insert signature automation below based on Person Responsible, Current User or an Ask by using the triConvey Toolbar.
6. Before saving the container, place the cursor in front of the <<Body Content>> tag.
Tip: This allows the cursor to go straight to the correct location when generating letters in a matter file.7. Save & Close the container.
8. Repeat the process for each relevant document container.
9. Test the automation by generating test letters in a matter file.
Automating based on Person Responsible or Current User
Signatures based on the Person Responsible or Current User (or other) data fields require If/Then/Else statements in order for the correct image to automate in the appropriate situation.
Watch the video below to follow it step-by-step.
To automate signatures based on Person Responsible or other data fields:
1. Select the gear icon from the top right corner of the triConvey Desktop App.
2. Select Document Containers from the left menu.
3. Right-click the Document Container and select Modify.
4. Place your cursor below the letter sign-off (for e.g., Yours Sincerely).
5. Select the If/Then/Else heading in the triConvey Toolbar.
- For the Person Responsible field, expand Matter Info.
- For the Current User field, expand Firm Details.
7. Select the Full Name.
Tip: This action satisfies the If condition of the If/Then/Else statement.

9. Select Insert to place the statement in the container.
Tip: This action satisfies the Then condition of the statement.


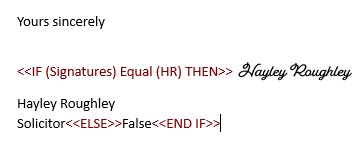
As is, the statement says that if Hayley Roughley is the Person Responsible for the matter, Hayley's signature image automates on the letter. If Hayley is not the Person Responsible, the word ‘False’ automates on the letter.
11. Remove the word False and leave the cursor between the <<ELSE>> and <<END IF>> tags.
Tip: Make sure to remove the word False from the final staff member's statement.
14. Insert automation fields for additional text (for e.g., Name & Role) below the entire If/Then/Else statement.
15. Complete steps 6-9 from Insert and verify signature automation instructions above.
By the end, your signature setup should look like this:
Good to know
- Staff names & roles come from the Staff & Users list in triConvey Settings.
- You can also type in the person’s name and role below the image file (and before the <<ELSE>> tag), though it is cleaner to add automation fields after the if/then/else statement.
- If other person-specific information cannot be accounted for with data fields (such as associations, awards, or more specific role titles) type it below the image file in the automation.
Automating based on an Ask
Using an Ask is like creating your own custom data fields for automation. It allows for complex signature automation when required. However, this is also the most difficult signature automation to set up.
It is simplest to base automation on existing data fields. So, it is best to avoid Ask automation if multiple signatures can be automated using data fields such as the Person Assisting field.
To automate signatures based on an Ask:
1. Select the gear icon from the top right corner of the triConvey Desktop App.
2. Select Document Containers from the left menu.
3. Right-click the Document Container and select Modify.
Tip: This will open the container in Word.4. Select the Ask tab from the triConvey toolbar.
5. Select Add.
- Field Name - give a reference name to the Ask. It does not appear in automation, so you can give any relevant name for e.g., ‘Signatures’ is a common Field name.
- Question - this question pops-up upon generating the document and is viewable by any precedent editor for e.g., ‘Who is signing this letter?’ is common.
- Answer type - select the Choice option for signature automation.
- Choices - enter each possible sign-off scenario for your firm. Using staff initials is common.
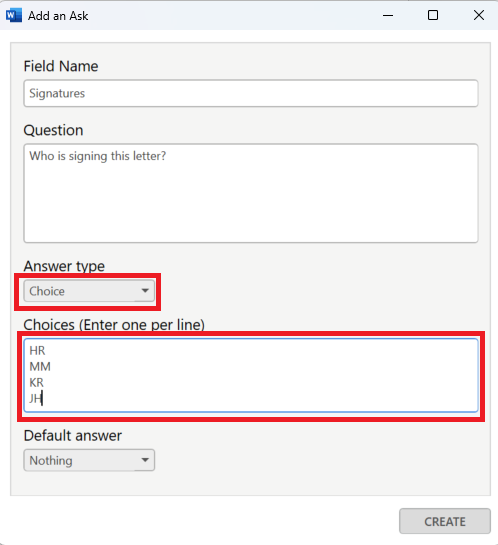
7. Click Create. The Ask automation now appears in the list.
8. The next step is to create If/Then/Else statements for every option in the Ask.

9. Click the If/Then/Else heading in the triConvey toolbar.
10. Place your cursor below the letter sign-off (for e.g., Yours Sincerely).
11. Select Ask from the If dropdown menu.
12. Select the newly created signature Ask from the list.
13. At the bottom of the toolbar, make sure the Equal field in the Is dropdown menu is selected.
Tip: This action satisfies the If condition of the If/Then/Else statement.

15. Select Insert.
16. The If/Then/Else statement appears in the container.
17. Replace the word True in the statement with the signature image file(s) relevant to the choice and name/role information.
Tip: This action satisfies the Then condition of the statement.

As is, the statement says that if HR gets selected in the Ask, Hayley's signature automates on the letter. If HR is not selected the word ‘False’ automates on the letter.
18. Remove the word False and leave the cursor between the <<ELSE>> and <<END IF>> tags.
Tip: Make sure to remove the word False from the final choice's statement.
Use Word tables to automate signatures side by side
It is possible to leverage Word’s Table feature to place multiple signatures side-by-side on your letterhead/container.
When using data fields (such as Person Responsible and Person Assisting) you can automate multiple signatures by creating a separate If/Then/Else statement in each table cell.
When basing automation on an Ask, you can create a new Word table after the relevant <<IF (xy) THEN>> tag, then place the signatures relevant to the choice in each cell.
If the signatures need to appear side by side:
1. Insert a 1x2 Word table.
2. Create the first signature automation in the first cell.
3. Create the second signature automation in the second cell.
4. Make the table borders invisible using Word formatting tools.
Was this article helpful?
That’s Great!
Thank you for your feedback
Sorry! We couldn't be helpful
Thank you for your feedback
Feedback sent
We appreciate your effort and will try to fix the article