Contacts are used in many areas of triConvey to manage clients and other parties relevant to a matter. Learn how to create contacts to save time manually entering information.
Table of Contents
- Getting Started
- triConvey Desktop App
- Additional tips
- triConvey Companion Site Web App
Getting Started
Contact information is used in many areas of triConvey such as precedent and letter automation. Fill in as much detail in contacts that you have available to make the most out of triConvey features.
triConvey Desktop App
1. From the triConvey Home Dashboard, select New Contact. 
2. Select whether the contact is for a Person or a Firm/Business/Organisation.
Tip: The information required will change according to what is selected. You cannot change the contact type once it has been created.
3. Enter information into each field as best you can.
Tip: The minimum information needed to save a contact is a Given Name.
4. Select Advanced view to open the contact card.
Entering details for an Individual Contact
For Individual contact cards, the Name & Contact Details, Additional Details, AML & VOI Details, and Execution Options tabs are where you will enter all the information for a contact.
Name & Contact Details
The Name & Contact Details tab is where you enter basic information about the contact's phone numbers and email.
Under the Letters section, you can choose the appropriate salutation for this contact when you send letters to them. The Custom field is where you can enter an alternative name the contact may go by (such as an anglicised name or nickname).
At the bottom of this tab is the Notes section, where you can add information like alternative addresses.
Additional Details tab
Additional details is where you can add in all other required information for your contacts including:
- Previous name/ Maiden name
- Occupation
- Date of birth (DOB)
- Date of death
- Identification numbers such as Licence number
- Citizenship Passport information
- Bank account details

AML & VOI
The AML & VOI Details tab is where you enter information regarding the contact's AML status. This is a requirement as per AML/CTF Tranche 2 regulations coming into effect from July 1 2026.

Execution Options tab
The Execution Options tab is where you enter information about the Execution type and Power of Attorney details, and the AML status of the POA.
- At the bottom of the contact card, tick Where permitted use execution by a legal representative on behalf of the person.
- By default, representing Another will be ticked however, if you are representing yourself you can change this here.
- The default signer will selected as the person responsible for the matter, if this is not the case you can un-tick this box and enter an additional signer.
- At the bottom of the contact card tick Where a 'custom' or 'blank' execution option exists in documents, use it option.
- Enter the details in the field that appears below or leave blank.
Entering details for a Firm/Business/Organisation Contact
For Organisation contact cards, the tabs available are the Organisation Details, AML & VOI Details, and Execution Options.

Organisation Details
Use the Organisation Details tab to enter basic information about the contact, like the Organisation Type and communication and bank details. At the bottom of the tab, you can enter Notes about the contact.
AML & VOI Details
The AML & VOI Details tab is where you enter information regarding the organisation's AML status. This is a requirement as per AML/CTF Tranche 2 regulations coming into effect from July 1 2026.
Execution Options
The Execution Options tab is where you enter information about the Company Execution, including the details and AML status of up to 2 directors.
Once you are done entering information in each tab, select Save at the bottom of the window.
Create a new contact from a matter
When a new matter is created, the Matter Details section contains many fields for entering contacts. The process then involves adding every required contact to the matter.
1. Select the plus icon to add a new contact.
2. The New Contact window will now open. Follow the steps above to create the contact.
Add a required contact field to a matter
You can add and remove contact fields displayed in a Matter by selecting the gear icon on the top-right corner of the matter window. 
Add another person to the contact card
When you have multiple contacts at the same address you can add them in.
1. Click Add another person from within the advanced contact view. 
2. Enter the details for this contact.
3. Click Save.
Your contacts will then display in the matter details.
If the contacts are at separate addresses:
1. Right-click on the first contact from Matter Details.
2. Select "Add contact" or "Add existing contact".
3. Enter the contact details and click Save.
Tip: You can add in as many contacts as required using the above methods.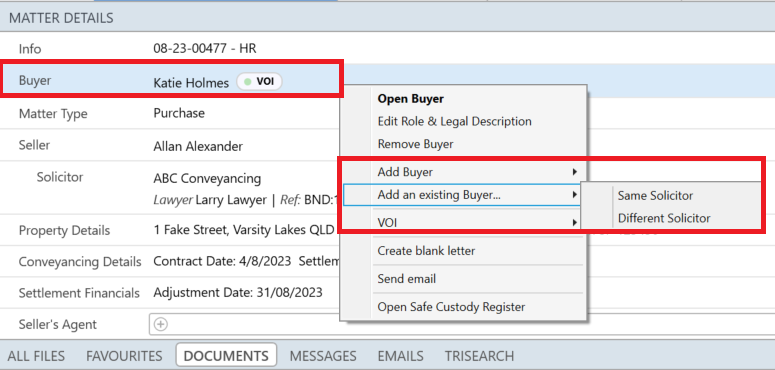
Enter an address or forwarding address
1. Select the Address box on the left panel to enter the contact's address details.
2. If you have the forwarding address of a contact, tick specify forwarding address to enter the details. 
Letters to this contact will now use the Forwarding address as the mailing address.
When you need to update the forwarding address to the current address:
1. Un-tick the Forwarding address box.
2. Select Yes to update this to the current address.
Additional tips
- Phone information for 'other side' contacts can be left blank. Your firm doesn't need that information because communication happens via their solicitor.
- Get in touch if you wish to import contacts in bulk from a .CSV file.
triConvey Companion Site Web App
The additional tabs that are available in the triConvey Desktop App are not available as fields in the triConvey Companion Site Web App.
1. Select Contacts from the left menu.
2. Select Add Contact. 
3. Select whether the contact you wish to enter is an individual person, or a business/organisation.
Tip: Your selection will change the contact details fields in the window.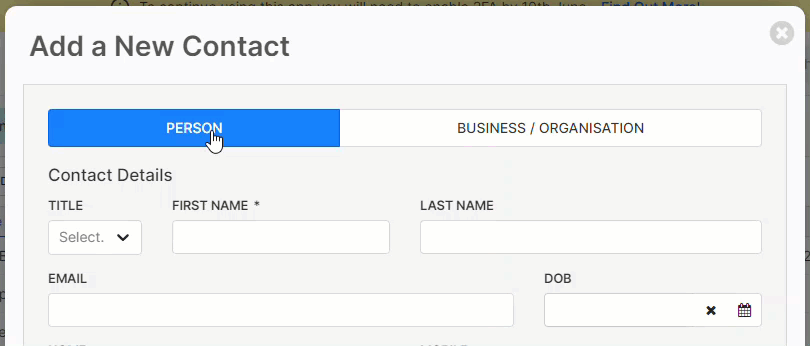
4. Enter the contact's details.
 |  |
5. Select Save.
Was this article helpful?
That’s Great!
Thank you for your feedback
Sorry! We couldn't be helpful
Thank you for your feedback
Feedback sent
We appreciate your effort and will try to fix the article