Learn how to enter your firm’s costs or disbursements in triConvey.
Table of Contents
Getting Started
You cannot add anticipated disbursements from the Desktop App, however you can do so from the triConvey Companion Site Web App.
triConvey Desktop App
1. Open a Matter and select the Time & Disbursements tab.
Tip: You can also access the Time & Disbursements window from the Time & Disbursements tab from the triConvey Home Dashboard. Any entries created here must be assigned to a matter before saving.2. Select Disbursements to open the Disbursement entry window.

- Date of the disbursement;
- Subject (limited to 1000 characters);
- Description;
- Select between Hard Cost or Soft Cost;
Tip: Hard costs are costs paid directly to the supplier, e.g. search fees and Soft costs are costs that your firm can choose to pass to the client, e.g. costs of printer paper and ink. Learn more about these types of costs.- Quantity;
- Price of the disbursement;
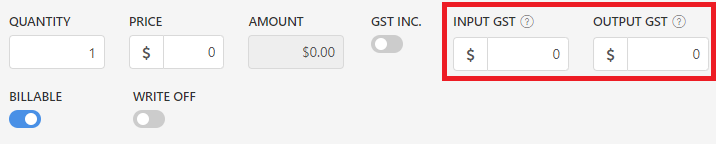
- GST details, including if Input GST or Output GST are different amounts.
Tip: Set up activity codes so you can use the Activity drop-down menu to automatically fill in most of these fields and save time entering the same disbursement.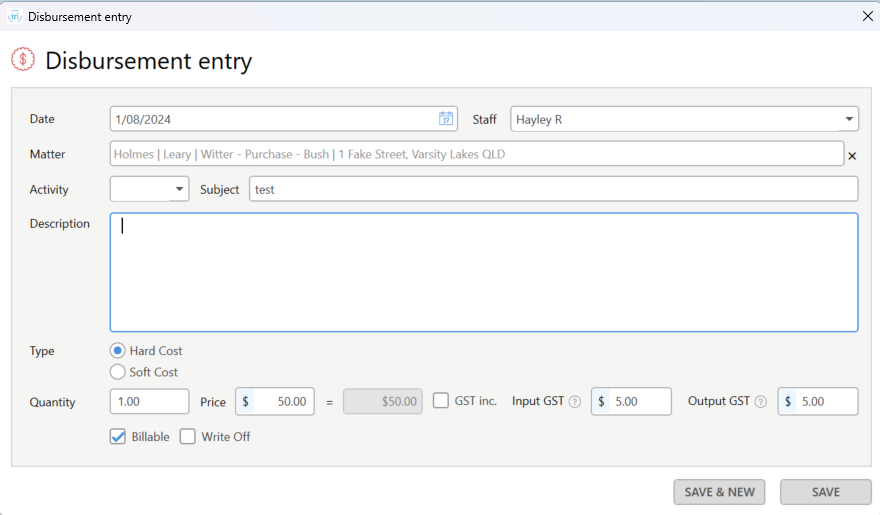
4. Tick whether the disbursement is Billable, or if you wish to write it off.
Quickly enter and review manual entries
You can also create disbursement entries from the bar at the top of the Disbursements tab in a matter.

Edit a disbursement
You can amend any fields in a disbursement until they are included in a finalised invoice, after which they cannot be edited. Revert your invoice back to a draft state in order to edit the disbursement.
1. Double-click on the disbursement in the Time & Disbursements > Disbursements tab from the triConvey Home Dashboard or within a matter.
2. Make your edits, then select Save.
Delete a disbursement
You cannot delete a disbursement if it has been included in a finalised invoice. In this case, revert the invoice back to draft before you delete it.
To delete a disbursement, right-click it and select Delete Disbursement.

triConvey Companion Site Web App
1. Open a Matter and select the Disbursements tab.
2. Select New Disbursement Entry.
3. Enter the date of the Disbursement and then enter the subject, description, quantity and price.
4. Choose whether the disbursement should be classified as a Hard Cost or Soft Cost.
Tip: Hard costs are costs paid directly to the supplier, e.g. search fees and Soft costs are costs that your firm can choose to pass to the client, e.g. costs of printer paper and ink. Learn more about these types of costs.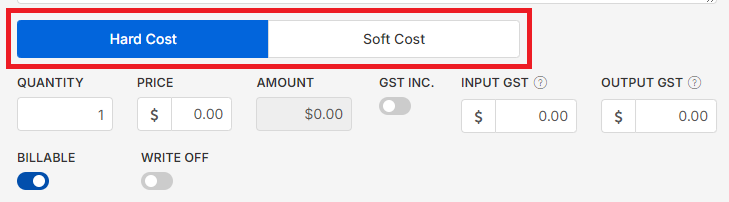
5. Select the toggles to choose whether the disbursement is Billable or if you wish to write it off.
7. Select whether this entry is a regular disbursement or an anticipated disbursement.
Tip: If it is an anticipated disbursement, enter the supplier name, supplier reference and your payment due date.
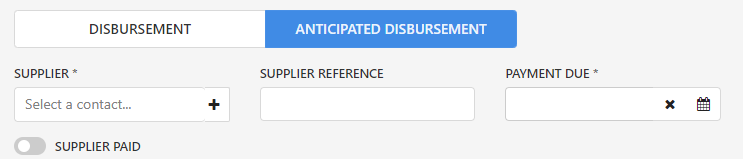
- If you toggle the Supplier Paid option, for either a Disbursement or Anticipated Disbursement, enter the supplier's payment details. This marks the disbursement as paid, so a journal entry dated to today's date will be sent to Xero or MYOB (if your firm uses these integrations).

8. Attach a receipt to this disbursement if applicable.
9. Select Save or Save & New to continue entering disbursements.
Quickly enter and review manual entries
You can also create disbursement entries from the bar at the top of the Disbursements tab in a matter.

Edit a disbursement
You can amend any fields in a disbursement until they are included in a finalised invoice, after which they cannot be edited. Revert your invoice back to a draft state in order to edit the disbursement.
1. Click on the disbursement in the Time/Fees > Disbursements tab of the main triConvey window or the Disbursements tab in a matter.
2. Make your edits, then select Update.

Delete a disbursement
You cannot delete a disbursement if it has been included in a finalised invoice. In this case, revert the invoice back to draft before you delete it.
To delete a disbursement, open it and select Delete this Disbursement.

Good to know
To calculate GST on the disbursement, you must enter at least the number 1 in the Quantity field.

If you are entering a disbursement that has no GST component (such as court filing fees), you can change the GST amount to 0 in the GST field of the disbursement entry.
Was this article helpful?
That’s Great!
Thank you for your feedback
Sorry! We couldn't be helpful
Thank you for your feedback
Feedback sent
We appreciate your effort and will try to fix the article