Securexchange is a digital solution that provides a simplified and protected workspace where Contracts can be Shared, Signed and Exchanged with all parties to the transaction having full transparency during the exchange process.
Table of Contents
- Review Firm and User Settings
- Launch Securexchange
- Share contract
- Sign contract
- Request Payment or Request bank details
- Tracking
- Contract Comparison
- Exchange contract
- Frequently Asked Questions
Getting Started
This guide is for NSW Contracts only. For any other jurisdictions, please refer to our Securexchange guide.
First time users of Securexchange will be prompted to create an account after launching it from the matter. Once the account has been created, we recommend first time users to refer to Review Firm and User Settings instructions below before proceeding to Launch Securexchange instructions.
For return users, ensure that the Contract being uploaded to the workspace is saved to your triConvey matter and then proceed to Launch Securexchange instructions below.
Review Firm and User Settings
1. Click the arrow next to your name on the top right of the Dashboard.
2. Select Account Settings.
3. Review your details and change if required.
4. Select the Your firm tab.
5. Review and complete Firm details.
Tip: Enter Trust Account details in Firm details. Trust Account details will be verified by the Securexchange team and will be automatically prefilled in the Funds section.6. Review and Add users at Your team.
7. Review and customise Securexchange colours and branding at Theme and logo.
Launch Securexchange
1. Open a Matter from the triConvey Desktop App.
2. Select Securexchange from the Matter Action Bar.
Tip: This will launch Securexchange in a separate browser.
Share contract
Contract statuses are displayed at the top of the workspace to better reflect what you need to do with the Contract: Share, Sign or Exchange.
Share workflow is most commonly used when the marketing Contract is to be shared with the Real Estate Agent.
1. Review and select Representative and Supporting staff.
2. Either:
- drop the Contract into the box provided; or
Tip: Ensure that the Contract is saved to your device.- click browse files from Smokeball, select the Contract from your triConvey matter and click Confirm.

3. Review Property details and enter Price guide (if required).
4. Review and/or complete parties details of who the Contract is to be shared with and invited to join the workspace.
Tip: Ensure to enter the mobile numbers of all parties being invited to the workspace.

4. Select Confirm and continue.
Tip: The invited party will receive notification of the invitation and shared Contract.
You will be directed to the Property overview of your workspace. Here, you can manage invitations, upload additional documents only to be shared with your client and access Actions such as Request payment, Request bank details, Upload a new contract of sale or import contacts.

Sign contract
Contract statuses are displayed at the top of the workspace to better reflect what you need to do with the Contract: Share, Sign or Exchange.
Sign workflow is most commonly used when either the Vendor or the Purchaser is required to sign the Contract.
Securexchange provides for flexible signing order allowing the Vendor to sign the contract before the Purchaser.
1. From the workspace, click Upload a new contract for sale.
2. Either:
- drop the Contract into the box provided; or
Tip: Ensure that the Contract is saved to your device.- click browse files from Smokeball, select the Contract from your triConvey matter and click Confirm.
3. Complete Purchaser's representative or Vendor's representative details.
Tip: A Vendor or Purchaser may only be invited to the workspace by the other parties representative, if their representative is also invited to the workspace. For example, a Vendor's representative cannot invite the Purchaser without also inviting the Purchaser's representative.4. Click Upload.
5. From the workspace, click Send for signing.

6. Select which parties to send the Contract to for signing.

7. Click Continue.
8. The signing tags will be automatically placed on the Contract. Additional tags can be dragged and dropped on the Contract. 
9. Click Finish & send FREE.

Parties will receive email notification with a link to sign the Contract. After clicking the link from the email, they will be required to enter an SMS Code which will be sent by text to their mobile device.
After entering the SMS Code they will be directed to sign the Contract via Docusign.
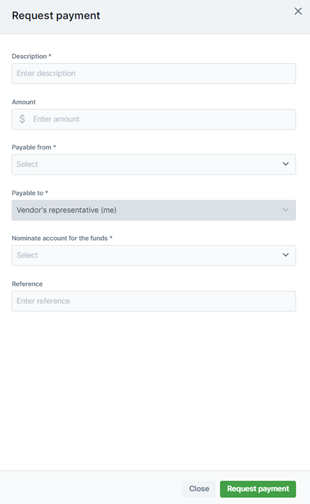
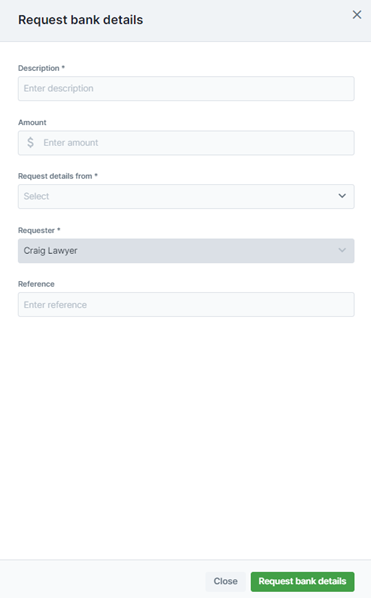
Request Payment or Request bank details
Requesting payments into your trust account for deposits or requesting bank details for any outgoing funds is secure and easy. After inviting the relevant parties into the workspace:
1. Select from either:
- Request Payment - share your trust account details; or
- Request bank details - from your client/s.

Tracking
1. You will be notified when a party takes any action within a workspace.
2. All workspaces statuses can be viewed from the Securexchange Dashboard.
Contract Comparison
The Contract Comparison tool will be enabled in the workspace once the Contract has been signed by both the Vendor and the Purchaser.
1. From the workspace, select Review contract.
Tip: The Contract can be downloaded by selecting the three vertical dots and selecting Download.
2. The two Contracts will be displayed side by side and then compared by the Comparison tool.
Tip: The Contracts are clearly labelled Purchaser Contract and Vendor Contract making it easy to distinguish between each Contract.
3. The Contract Comparison tool will highlight any discrepancies in purple.
Exchange contract
Contract statuses are displayed at the top of the workspace to better reflect what you need to do with the Contract: Share, Sign or Exchange.
Exchange workflow is used when the Contract has been signed by both the Vendor and the Purchaser, the Contract has been compared by the comparison tool and is ready for exchange.
1. From the contract comparison tool, select Date & Exchange.
Tip: To exchange Contracts manually, select the down arrow next to Date & Exchange and select Exchanged manually. To send the Contract to the Agent for exchange, select Send to agent and follow the prompts.
2. Contracts will then be exchanged and the date inserted into the Contract.
3. Exchanged Contracts will be saved back to your triConvey matter.
Frequently Asked Questions
Was this article helpful?
That’s Great!
Thank you for your feedback
Sorry! We couldn't be helpful
Thank you for your feedback
Feedback sent
We appreciate your effort and will try to fix the article