eCOS+ streamlines creating and compiling your NSW electronic Contracts of Sale. With a simple 4 step workflow you will be guided through ordering all necessary searches and certificates, editing, compiling and sending your contracts from triConvey.
Table of Contents
- Getting Started
- Launching eCOS+
- Step 1: Order title & certificates
- Step 2: Front pages
- Step 3: Special conditions
- Step 4: Contract
- Frequently Asked Questions
- Special Conditions Frequently Asked Questions
Getting Started
For maximum efficiency, the following steps should be completed prior to Launching eCOS+:
- Create a NSW Sale of Land matter.
- Create & save a Matter Ref.
- Enter Vendor contact details.
- Enter Real Estate Agent details if applicable.
- Enter Improvements and Inclusions.
Launching eCOS+
1. Open a Matter from the triConvey Desktop App.
2. To access eCOS+ either:
- click the TRISEARCH tab and then select eCOS+ from the Matter Action Bar; or
- select eCOS+ directly from the Matter Action Bar.
Tip: This will launch eCOS+ in a separate window.
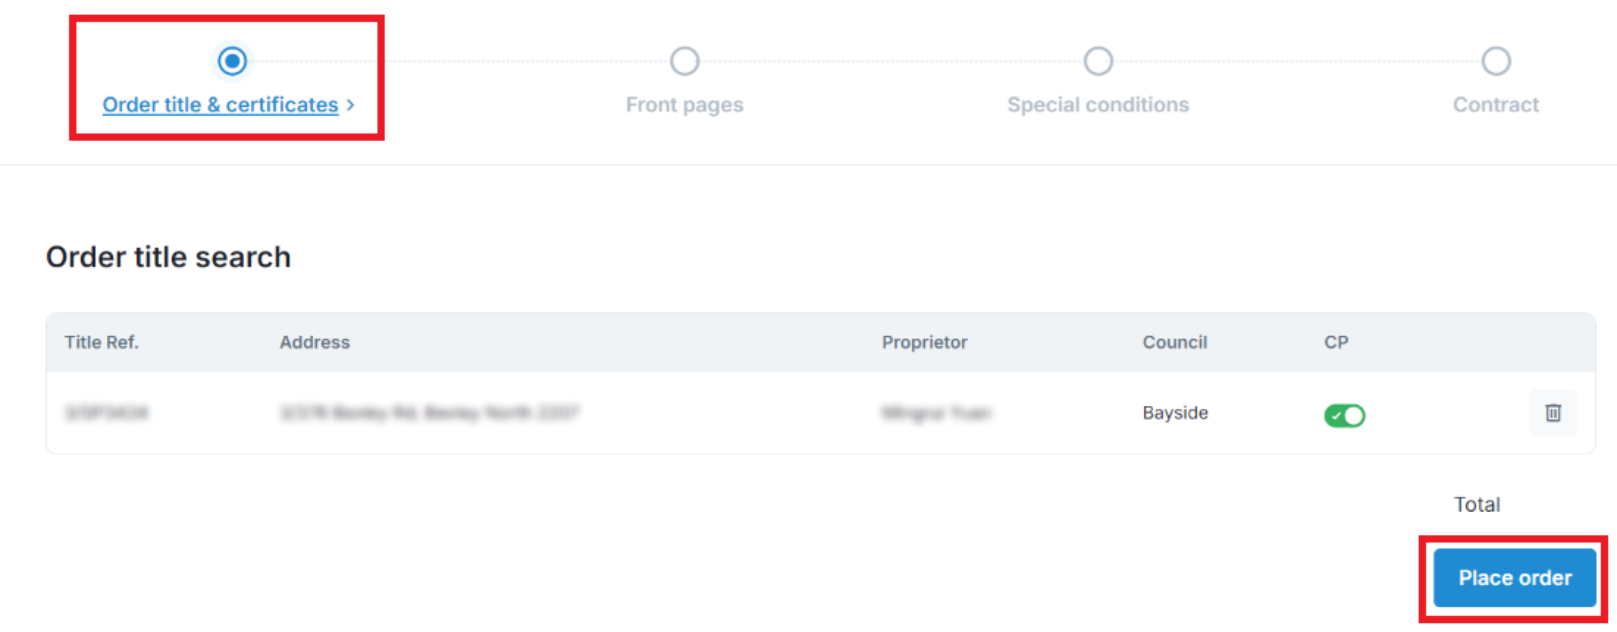
Step 1: Order title & certificates
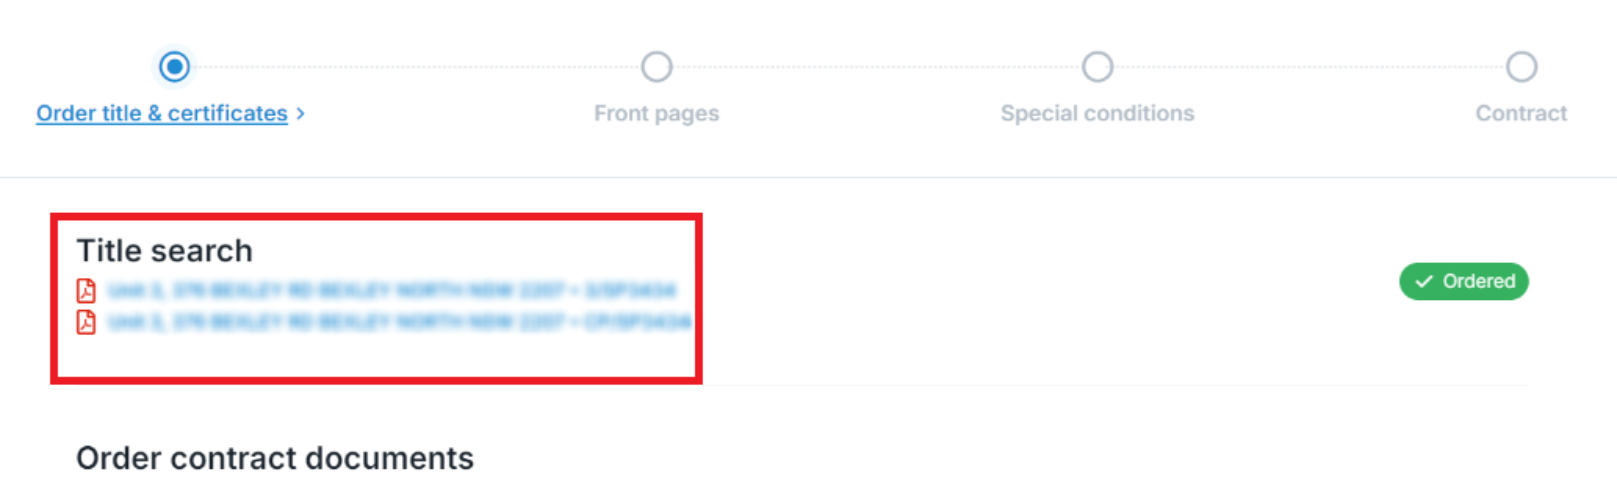
2. The title search will now be available to view from the top of the page.

Prescribed documents will automatically be selected for your contract. These can be deselected by simply unticking the checkbox next to the document.
Tip: If you deselect a prescribed document, you are able to reselect all prescribed documents by clicking Auto-select prescribed documents.
Make sure to scroll down the page, review the Contract watermark, make any amendments to the address and then click Place order.
Tip: The Contract watermark will not be able to be amended after this step.You will be directed to Step 2 in the workflow, Front pages.
Step 2: Front pages
The Contract will be prefilled with details populated from your triConvey matter and the title search.
All fields on the contract pages are editable.
The List of Documents checkboxes on page 4 of the contract will automatically be checked in accordance with the prescribed documents ordered at Step 2 of the workflow. The checkboxes can be manually checked or unchecked.
Once all edits have been made to the contract pages, select Save and continue.
You will be directed to Step 3 in the workflow, Special conditions.
Step 3: Special conditions
When accessing the NSW Contract for the first time, you will be prompted to upload special conditions. You can either upload a template that will be editable and reusable OR upload a static document that can be saved for future use but will not be editable.
Multiple versions of special conditions can be uploaded allowing you to select the required set of conditions at contract creation.
Upload special conditions template for the first time
1. Select either:
- Editable template - to upload a template that will be editable and reusable; or
- Document - to upload a static document that can be saved for future use but will not be editable.
2. Select Continue.

3. Either:
- select from displayed documents saved to your triConvey matter and select Upload; or
- click Browse computer and follow the prompts to upload documents from your device.
Tip: Make sure to have them saved to your device before uploading.
4. The template will now be displayed for review.
- If an Editable template was selected, the formatting tool bar will appear allowing edits to be made to the special conditions.

Either:- select Save and continue - this will ensure the edits made only apply to the contract that is in progress; or
- select Update in library - this will update your saved template for use in future contracts.
- If a Document was selected, the formatting tool bar will be hidden as no editing function is available.
Either:
- select Continue; or
- select Add to library - this will save the document to your library for use in future contracts.
You will be directed to Step 4 in the workflow, Contract.
Upload multiple special condition templates
1. Select Upload from the top right corner.

2. Select either:
- Editable template - to upload a template that will be editable and reusable; or
- Document - to upload a static document that can be saved for future use but will not be editable.
3. Select Continue.
4. Either:
- select special conditions saved to your triConvey matter; or
- Browse from computer and follow the prompts to upload your special condition template from your device.
5. Click Upload.
6. The template will now be displayed for review.
- If an Editable template was selected, the formatting tool bar will appear allowing edits to be made to the special conditions.
Either:- select Save and continue - this will ensure the edits made only apply to the contract that is in progress; or
- select Update in library - this will update your saved template for use in future contracts.
- If a Document was selected, the formatting tool bar will be hidden as no editing function is available.
Either:
- select Continue; or
- select Add to library - this will save the document to your library for use in future contracts.
You will be directed to Step 4 in the workflow, Contract.
Manage special condition library
1. Select the gear icon from the top right corner.

Manage your special condition library to:
- upload additional special conditions by selecting Create new;
- mark conditions as a favourite by selecting the star symbol; and
- mark conditions as a favourite, rename or delete special conditions by clicking on the three dots.

2. Select Close.
You will be directed to Step 4 in the workflow, Contract.
Switch between special conditions
1. Click the Switch special conditions drop down menu.![]()
2. Select the special conditions required for your contract.
3. The newly selected special condition template will be displayed.
When ready, select Save and continue.
You will be directed to Step 4 in the workflow, Contract.
Step 4: Contract
The Contract step is where additional documents can be uploaded, the Contract can be rearranged and compiled and saved back into your triConvey matter.
Upload additional documents
1. Select Upload files.
2. Either:
- select from displayed documents saved to your triConvey matter and select Upload; or
- click Browse computer and follow the prompts to upload documents from your device.

Editing order of contract
The documents listed in the left panel act like bookmarks. If you click on one of the listed documents, it will take you directly to that document in the compiled contract.
Documents can also be reordered. Simply click on the 6 dots next to the document and drag and drop into place.

Share contract
To support sharing of large files, you can now generate a downloadable link to the contract that can be shared with the relevant parties.
To do this select from either:
- Email link via triConvey - this will automatically launch an email attaching the link; or
- Copy link - to paste into your preferred communication channel.

The Contract can also be shared directly from your triConvey matter.
Sharing link will automatically update when edits are made to the contract. Once purchaser details or price are added, you will need to share a new link.
Frequently Asked Questions
- plans;
- dealings (excluding mortgages and leases);
- Section 10.7(2) certificate;
- sewer service diagram; and
- service location print.
If any of the prescribed documents are deselected, an option will appear at the top of the list to automatically re-select the default prescribed documents.
- The Vendor Solicitor data is mapping from the triSearch client details. If they are appearing incorrect, review and update details on the Settings page of your triSearch account.
- The Land information is mapping from the LRS lookup associated with the title search.
When excluded, the document will still appear in the list of documents but will be greyed out and will not display in the preview or compiled contract.
To add a document back in, simply switch the toggle back on.
Once the contract is fully compiled and all steps of the workflow are completed, you will be able to access any step in the workflow.
Special Conditions Frequently Asked Questions
Word 1997-2003 version is not supported. These will need to be converted to PDF.
1.Click the gear icon from the top right corner of the Special conditions step.
2.Select the 3 dots next to the relevant template.
3.Select Favourite.
This will change the Favourite and add a star next to the selected template.
2.Select the 3 dots next to the relevant template.
3.Select Delete.
Was this article helpful?
That’s Great!
Thank you for your feedback
Sorry! We couldn't be helpful
Thank you for your feedback
Feedback sent
We appreciate your effort and will try to fix the article