Learn how to create your own Intake Form with your desired fields.
Table of Contents
- Accessing the Intake Forms builder
- Creating the form
- Changing the form type
- Building the form
- Adding conditions to your form
- Previewing your form
- Making your form active
- Editing your form
- Duplicating a form
- Organising your forms
- Deleting and restoring a form
- Embedding the form on your website
Accessing the Intake Forms builder
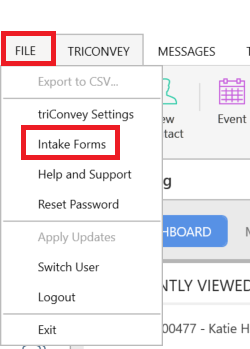
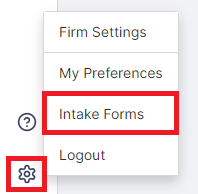
Navigate to Intake Forms from either:
2. Select Intake Forms.
2. Select Intake Forms.
Creating the form
1. Select Create form. 
2. Select the Form type, enter the Form name, select the relevant State/s and Matter type/s.
Tips:
1.  If your matter type or state is not appearing here, ensure you have selected them in Firm Settings.
2.  Select Build custom form to create a blank form with no information.
3. Select Create form to be be taken to the Form Builder.
Changing the form type
If you wish to change a form from Lead Intake to Matter Intake or vice versa:
1. Click on the Matter type text under the form's name.
2. The Update Form window will open, where you can make changes to the form.
Important notes
1. Changing the form type will reset the Matter Types drop-down menu. You must reselect them before updating the form.
2. Mapped field components that were present in the original form will be converted into Text components.
Building the form
A custom intake form is made up of sections that contain components.
Sections
The left panel of the form builder contains all the form sections. Each section represents a page for your form. For example, the first section could be where a prospective client enters their basic information and the second section could be where they start providing details.
Select the Text icon next to the Section Title to add a brief description of the section.
Select Edit to add, rename, delete or rearrange sections in the form.
Components
The right panel of the form builder contains components, the building blocks for the form. To add a component, drag it over a + icon in the middle of the form builder.
Rename a component by clicking on its name, entering the new name and pressing the Enter key on your keyboard. Highlight the text to make it bold, italics or to insert a link.
Rearrange components on the form by dragging the dots on the left side of the component.
Select the field settings icon on the top-right corner of the component to access further actions, such as adding description text, marking the component as mandatory or deleting the component. Field settings may vary depending on the type of component.
Click on the component name to convert it into a different type of component. This is useful if you have changed the type of intake form (e.g. converted it from Matter to Lead intake or vice versa), as switching form types will convert mapped components into text components.
To move an existing component to a different section, drag and drop it onto the desired section.
List of Components
A Mapped field component allows you to add fields that will be mapped back to that respective field in the lead or matter. To add mapped fields, expand on the categories listed under Available fields and tick the fields to add to the form.
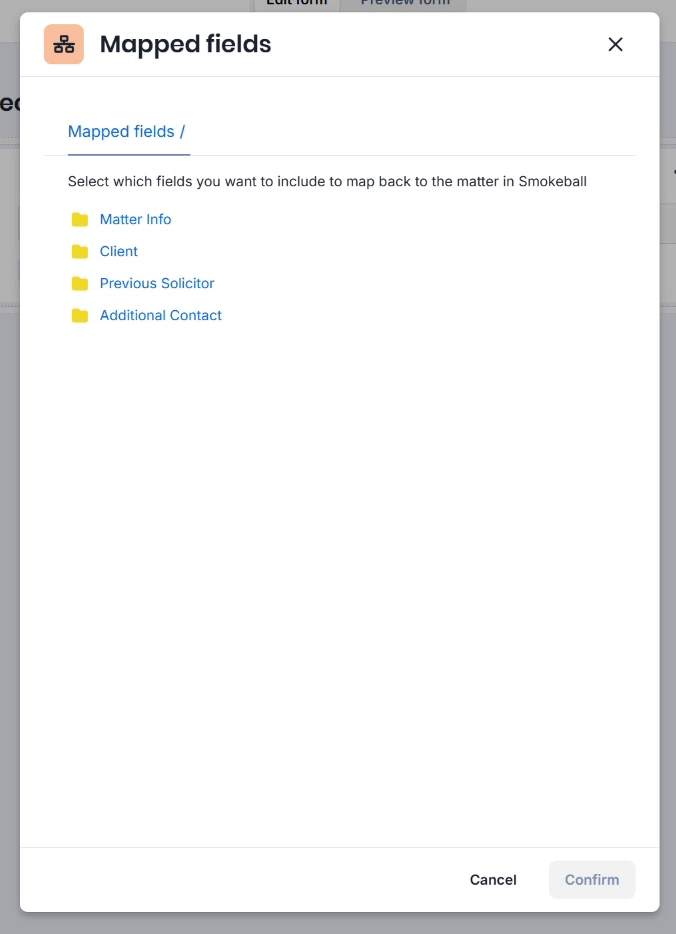
Mapped fields are indicated by the orange diagram icon, which also tells you which field in the triConvey lead or matter it is mapped to.

Short text
The Text component is where respondents can enter short-form text. Handy Hint: Select the T icon to add more text in this component.
Long text
The Multi-line text component allows respondents to enter longer-form text, such as paragraphs. Handy Hint: Select the T icon to add more text in this component.
Date
The Date component allows respondents to enter a date.
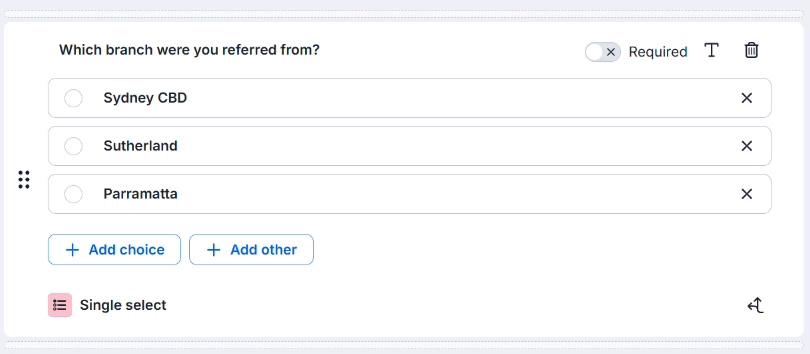
Single select
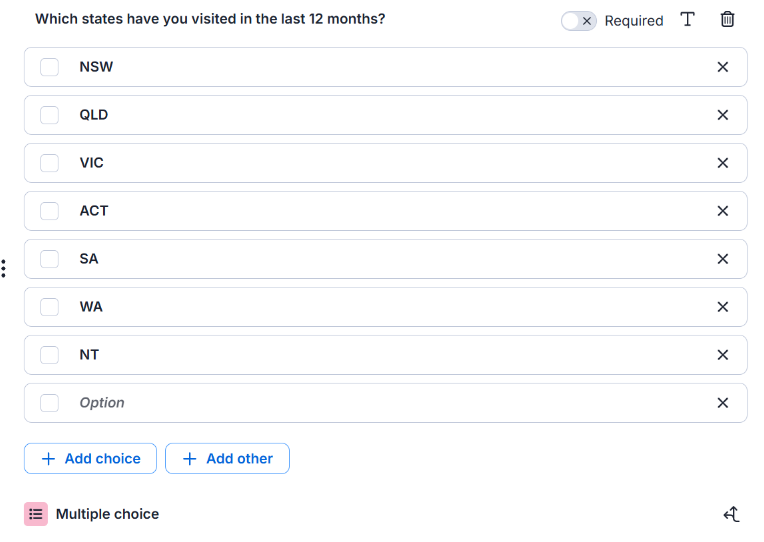
The Single select component allows respondents to choose one option from a list. Click on Add choice to add a new option, and Add other to add an option for "Other".
Multi-select
The Multi-select component allows respondents to choose multiple options from the list. Click Add choice to add a new option, and Add other to add an option for "Other".
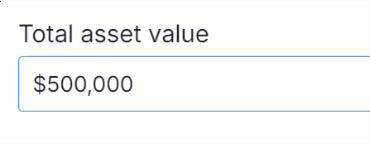
Currency
The Currency component requires respondents to enter a monetary value in the field.
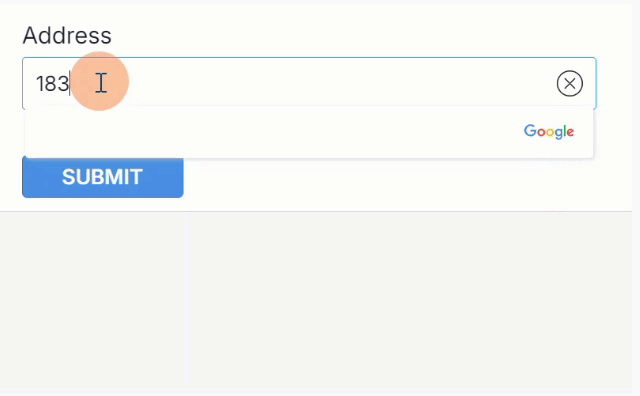
Address
The Address component requires respondents to enter an address in the field. Addresses entered in this field can be auto-completed using Google Maps.
Phone number
The Phone number component requires respondents to enter a phone number in the field. They cannot enter letters or symbols in this field.
The Email component requires respondents to enter an email address in the field.
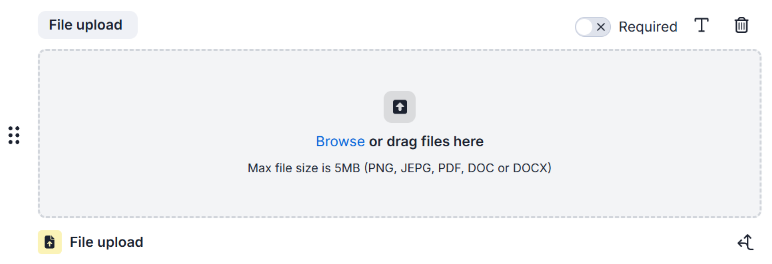
File upload
The File upload component allows respondents to attach any files to the form. There is a limit of 5 files, with a maximum of 512MB each.
Number
The Number component allows only numerical input and restricts any non-numerical input. Use the Phone number field if you are collecting phone numbers from the client.
Group of fields
The Group of fields component is a handy way to cluster fields together.
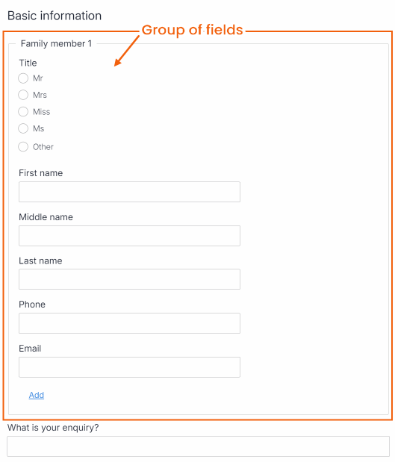
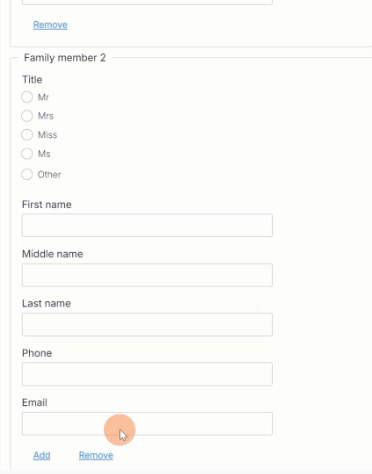
One of the most useful features of using groups is the Repeat Fields button. This is especially handy when you need to collect identical information for multiple family members such as the husband, wife, and children. You no longer have to manually create fields for each family member as this feature automates the process. Learn more about repeat fields.

When clients need to enter information for another family member, they can click Add and the fields will automatically duplicate for them.
Appointment
The Appointment component allows clients to book specific staff members at designated times. The available staff and times can be configured to prevent double-booking. Scheduled appointments also sync with your staff members' triConvey calendars for easy tracking.
Learn more about setting up an Appointment component.
Adding conditions to your form
Conditions create a logical flow in your form based on the responses given. For example, if a respondent selects an option in a Choice component or enters information in a text field, a different component will appear based on what they selected.
You can set up conditions in the following component types:
- Text - includes Text options in mapped fields.
- Choice - includes Choice options in mapped fields.
- Multi-select.
- Number.
To access conditions:
1. Select the double arrow icon from the bottom-right corner of the component where you wish to start the flow.
2. Select Add condition. An "If" and "Then" line will appear on the screen.
3. The "If" line triggers what happens in the "Then" line. Select the appropriate options under the Choice and Answer drop-down menus. 
4. Select the appropriate Component.
- Question: Send the respondent to a single component in the remaining form.

- Section: Send the respondent to a different section in the remaining form.

- Group: Send the respondent to a Grouped Field in the remaining form.


5. Select Add condition to add multiple conditions to the component.
6. Once you are done, select Save.
Important Notes
1. When selecting a component in the Then line, only subsequent components to the form will appear. This prevents you from creating circular logic flows.
2. Components with condition/s attached to them are denoted with a red notification on the arrow icon.
3. You can chain conditions together as far as you like. The top of the conditions window displays the condition set before and after a component, so you can check the flow at a glance.
Previewing your form
1. Select Settings to preview and make changes to the confirmation message that appears after the respondent completes the form.
2. Select the Preview form button at the top of the form builder to view how the form appears to respondents.
3. To easily progress through the form without filling in mandatory fields, uncheck Field validation.
4. You can also choose from a set list of automated fields by selecting the A icon in the text editor.
Saving your progress
Your progress is automatically saved as you build your form, so there is no need to worry about creating the form all at once.
Making your form active
Once you are ready to share the form, toggle on Active next to the Settings button. 
You can also toggle it on from the list of intake forms.
Editing your form
You can return to the editor at any time by accessing the list of Intake Forms and clicking on the form you want to edit.
Note that you cannot edit forms that list "triConvey" as the Created By user. However, you can duplicate the form and edit the duplicate if you wish.
Duplicating a form
You can duplicate a form by clicking the three dots icon next to a form and selecting Duplicate. This will help you to make minor modifications to the form without having to recreate it.
Organising your forms
You can filter matter and lead intake forms by state, matter type and creator using the filter icon.

Deleting and restoring a form
To delete an Intake Form, select the three dots icon next to it and click Delete.
To restore a deleted Intake Form, filter the list of forms to only show Deleted forms. 
Then, select the Restore icon next to the form.
Embedding the form on your website
To enable prospective clients to complete your custom form, you can embed it on your website.
Was this article helpful?
That’s Great!
Thank you for your feedback
Sorry! We couldn't be helpful
Thank you for your feedback
Feedback sent
We appreciate your effort and will try to fix the article